🧙 Exercise 1: Connect to Your Magical LLM
🎯 Exercise Overview
Welcome to your first spell in the Testus Patronus journey! In this exercise, you'll connect your Dify instance to a powerful Azure-hosted Large Language Model (LLM), which will become the core of your AI assistant.
✨ This is the foundation of your Retrieval-Augmented Generation (RAG) assistant. Without a working LLM, the magic won't flow.
Release baseline: This exercise targets the August 2026 workshop default, Dify 1.16.1. The dated compatibility choices in the header may use slightly different labels or layouts, but the model-provider goal is the same.
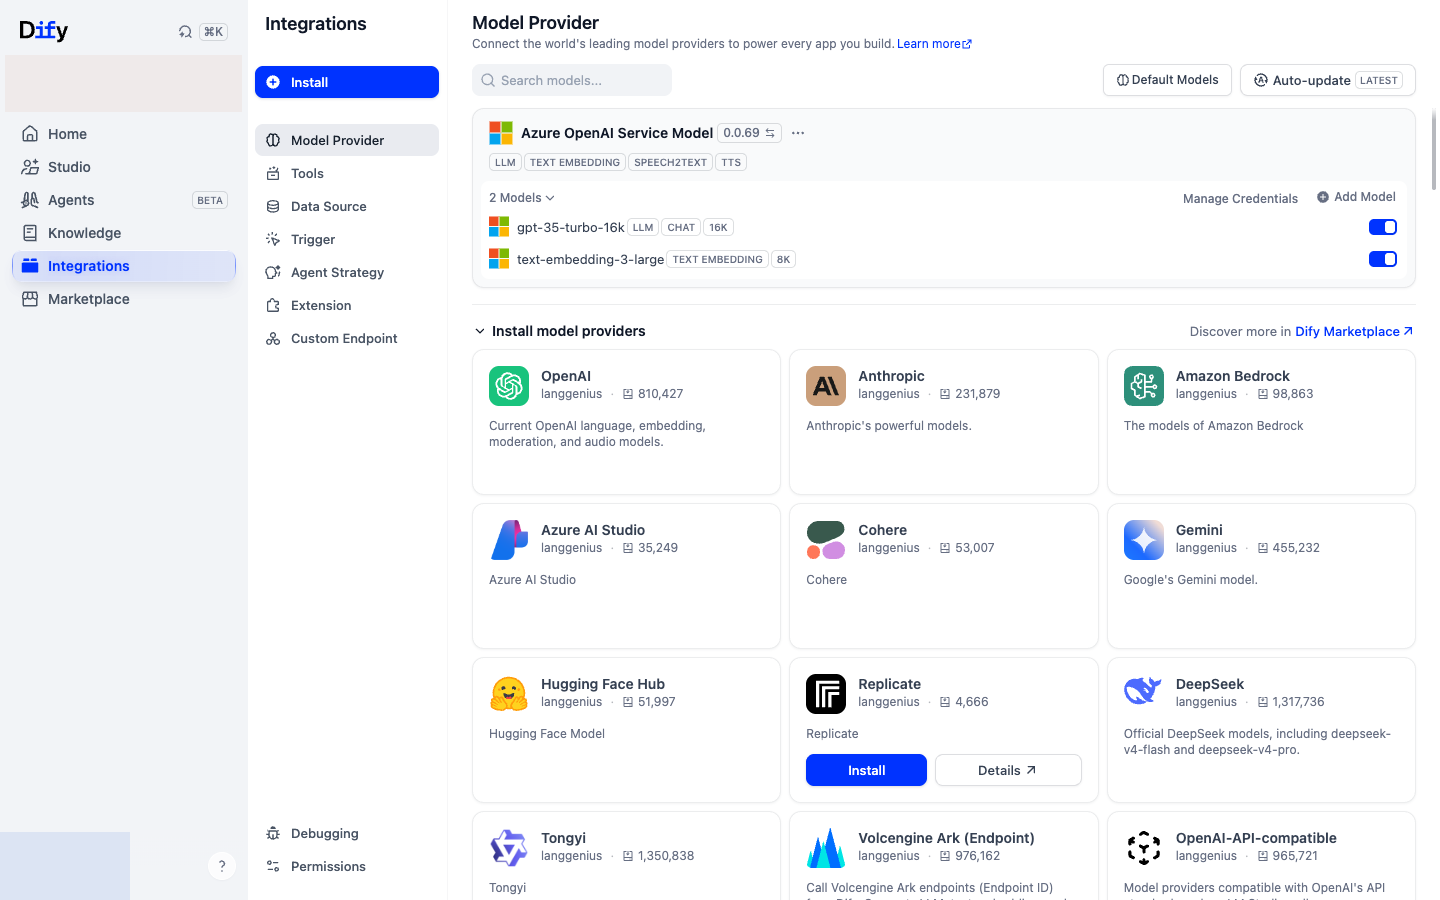
Verified 1.16.1 path: install Azure OpenAI Service 0.0.69 from Integrations, configure gpt-35-turbo-16k and text-embedding-3-large, then select them under System Model Settings. The screenshots below were captured from a successful disposable-instance run with secrets hidden.
🚀 What You'll Build
- Connect to Azure-hosted GPT models
- Configure both LLM and embedding models
- Create your first AI chatbot
- Test the complete workflow
📋 Step-by-Step Checklist
🎯 Exercise Checklist
⏱️ Estimated Time: 15-20 minutes | 🎯 Goal: Working AI chatbot with Azure LLM
🛠️ Step 1: Launch Your Dify Instance
📋 What You'll See
You'll be redirected to a personalized portal with your credentials:

📋 This Page Contains:
- Dify Instance URL - Your personal Dify dashboard
- Azure LLM Credentials - For both GPT-3.5 and Embeddings
- Session Reminder - Instance is ephemeral (save your work!)
🧠 Pro Tip: Keep this tab open during the session for easy copy/paste access to your credentials.
🛡️ Step 2: Dify Admin Account Setup
📋 Setup Process Overview
You'll need to create an admin account using the provided credentials. Follow these 3 steps:
🔑 Step 2.1: Copy Your Admin Credentials
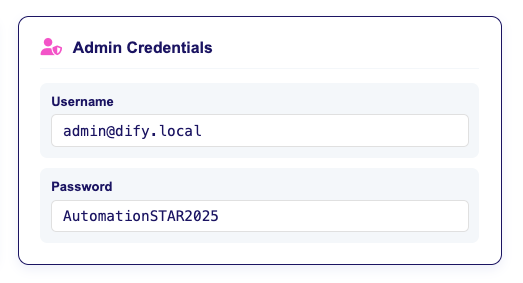
🌐 Step 2.2: Navigate to Your Dify Instance
Next: Use the Dify instance URL from your credentials to navigate to your personalized Dify dashboard.
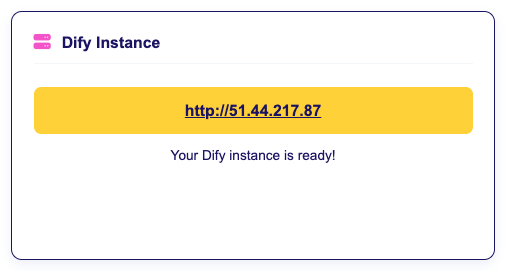
👤 Step 2.3: Create Your Admin Account
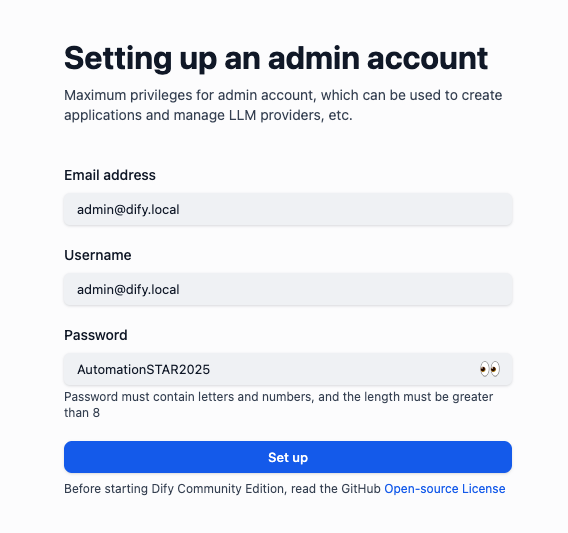
🧠 Pro Tip: Use the provided credentials for your admin account - it's easier to remember and you'll have them handy for the session.
💡 Keep this tab open during the session for easy copy/paste access.
🧪 Step 3: Log in to Dify
Once the Admin Account is created, you will be logged in directly to the Dify dashboard.
🗂️ Explore Dify's Main Sections
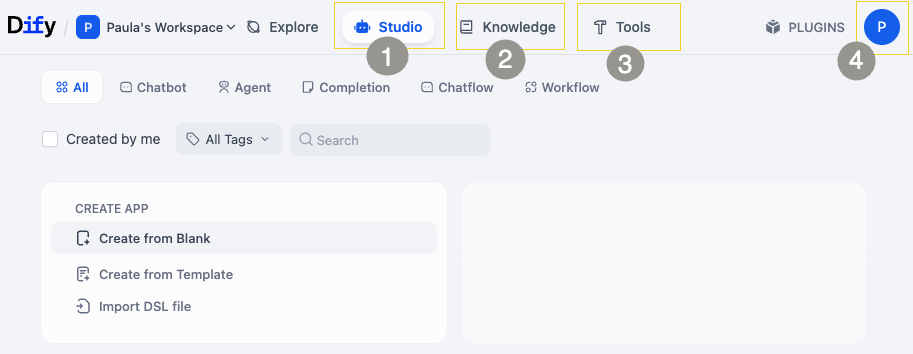
🎯 Main Sections Overview
🎨 Studio: Design and manage your chatbots using visual blocks and workflows.
📚 Knowledge: Upload documents your assistant can reference—perfect for product specs, requirements, and test cases.
🔧 Tools: Access extra plugins, service integrations, and advanced settings.
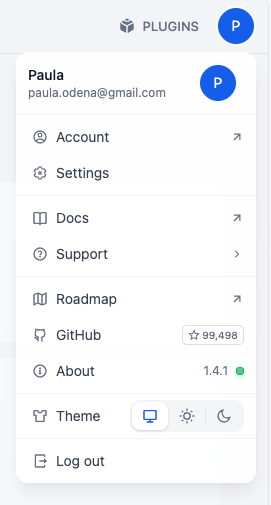
⚙️ Settings: Manage model providers, keys, and other configuration options.
🎯 Next: Navigate to Settings
- Click on your user icon (top-right corner with your profile picture)
- Select "Settings" from the dropdown menu
- Navigate to "Model Provider" tab
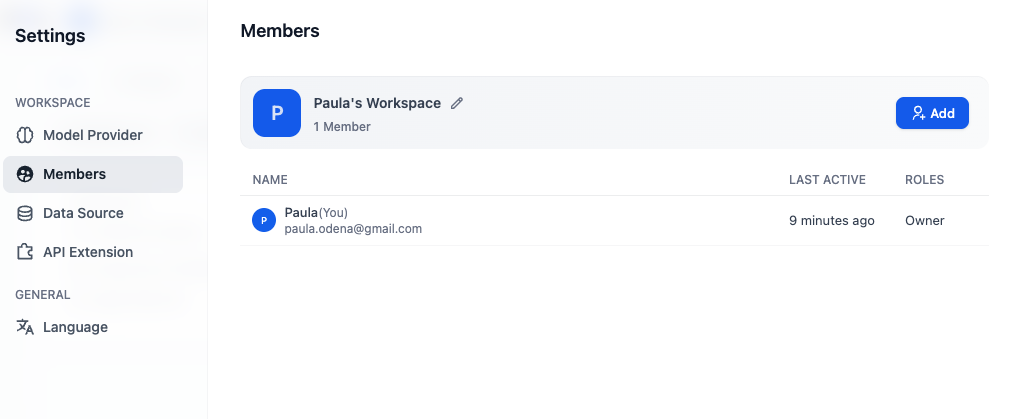
🔗 Step 4: Configure the Azure GPT LLM
Now let's wire your Dify to use Azure-hosted GPT models.
🧭 Model Selection Guide (Before You Configure)
Use this quick framework to choose the right model for each task in this workshop.
External benchmark reference: Use Artificial Analysis to compare quality, latency, and relative cost before selecting a provider/model.
| Task | Recommended model profile | Why |
|---|---|---|
| Requirement Q&A in chatbot | Balanced chat model (good quality/cost) | You need consistent answers with moderate latency. |
| Knowledge retrieval embeddings | High-quality embedding model | Embedding quality strongly impacts retrieval relevance. |
| High-volume test experimentation | Lower-cost/faster model | Faster feedback loops while iterating prompts and flows. |
| Sensitive/private workloads | Local or self-hosted model | Helps meet data residency and control constraints. |
⚙️ Core Model Parameters You Should Tune
- Temperature: start at
0.2-0.4for deterministic testing tasks; increase for creative generation. - Top P: keep at
0.8-1.0; avoid changing both Top P and Temperature aggressively at the same time. - Max Tokens: cap output to control cost and reduce noisy long answers.
- Frequency/Presence Penalties: use low values first; they can reduce repetition but also remove needed terminology.
- Context Window: ensure your model can handle prompt + retrieved chunks + expected answer length.
- Timeout/Retry: set explicit limits so workflow runs fail fast and are easier to debug.
Recommended baseline for this workshop: Temperature 0.3, Top P 0.9, and a moderate max token cap. Change one parameter at a time and re-run the same validation questions.
1. Install Model Provider
Navigate to Settings → Model Provider
Important: Select the Azure OpenAI Service provider.
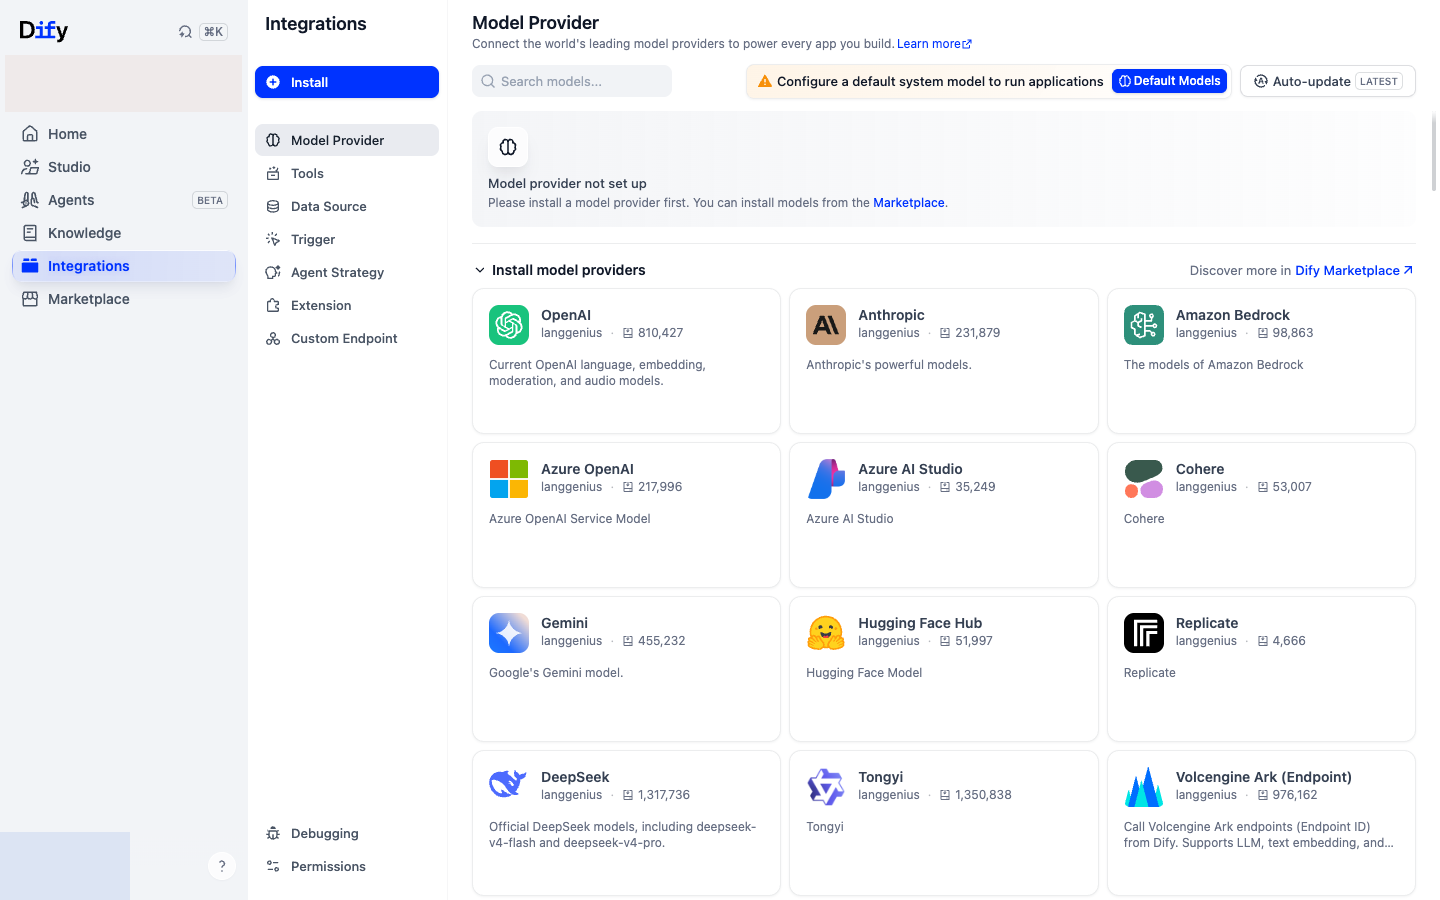 Screenshot: Model provider settings page
Install Azure OpenAI Service
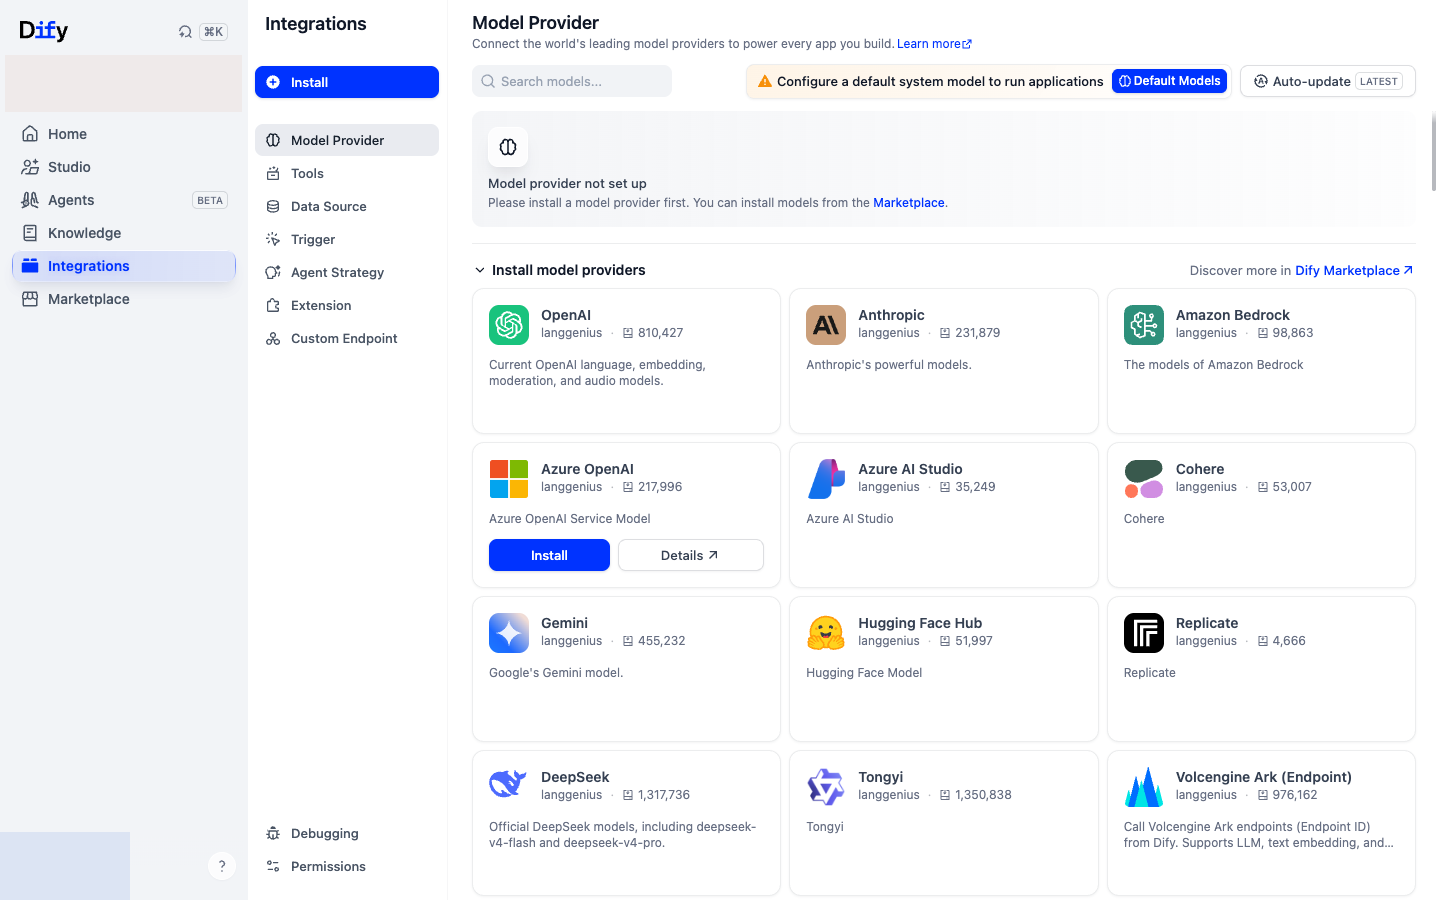 Screenshot: Installing Azure OpenAI service
2. Add a GPT-3.5 LLM
Use the credentials provided earlier to configure the model:
🔧 Configuration Steps
Add models to your Azure OpenAI Service and configure using the provided credentials.
📸 Add Model Interface
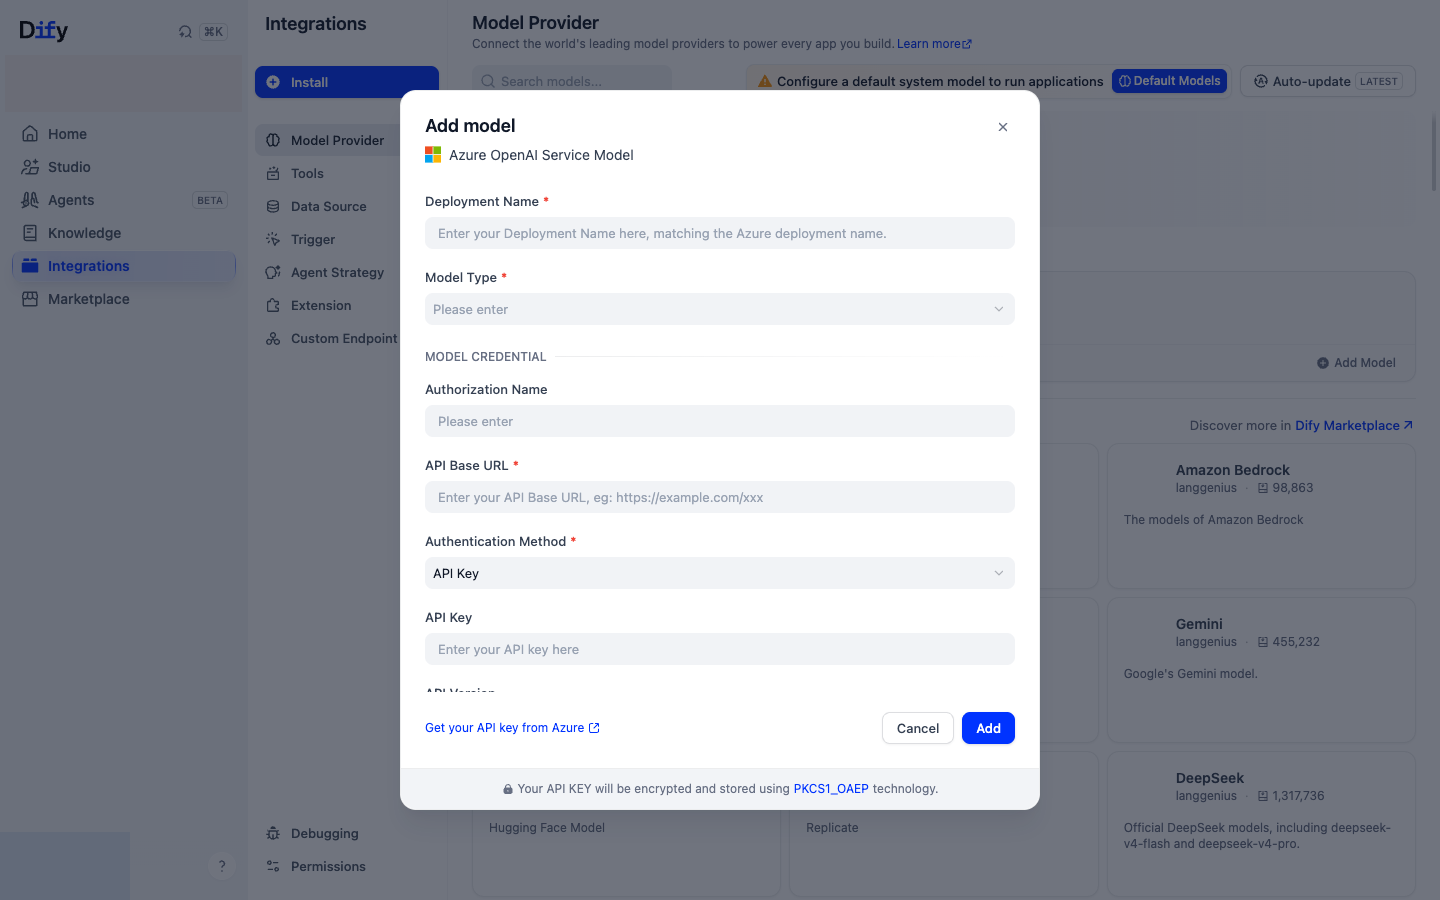
📋 Configuration Values
Use the credentials provided earlier to configure the model:
| Field | Value |
|---|---|
| Provider | Azure OpenAI |
| Model Name | gpt-35-turbo-16k |
| Endpoint | (paste endpoint URL) |
| API Key | (paste your key) |
| API Version | 2024-12-01-preview |
3. Add Embedding Model
🔧 Configuration Steps
Add models to your Azure OpenAI Service and configure using the provided credentials.
📸 Add Model Interface
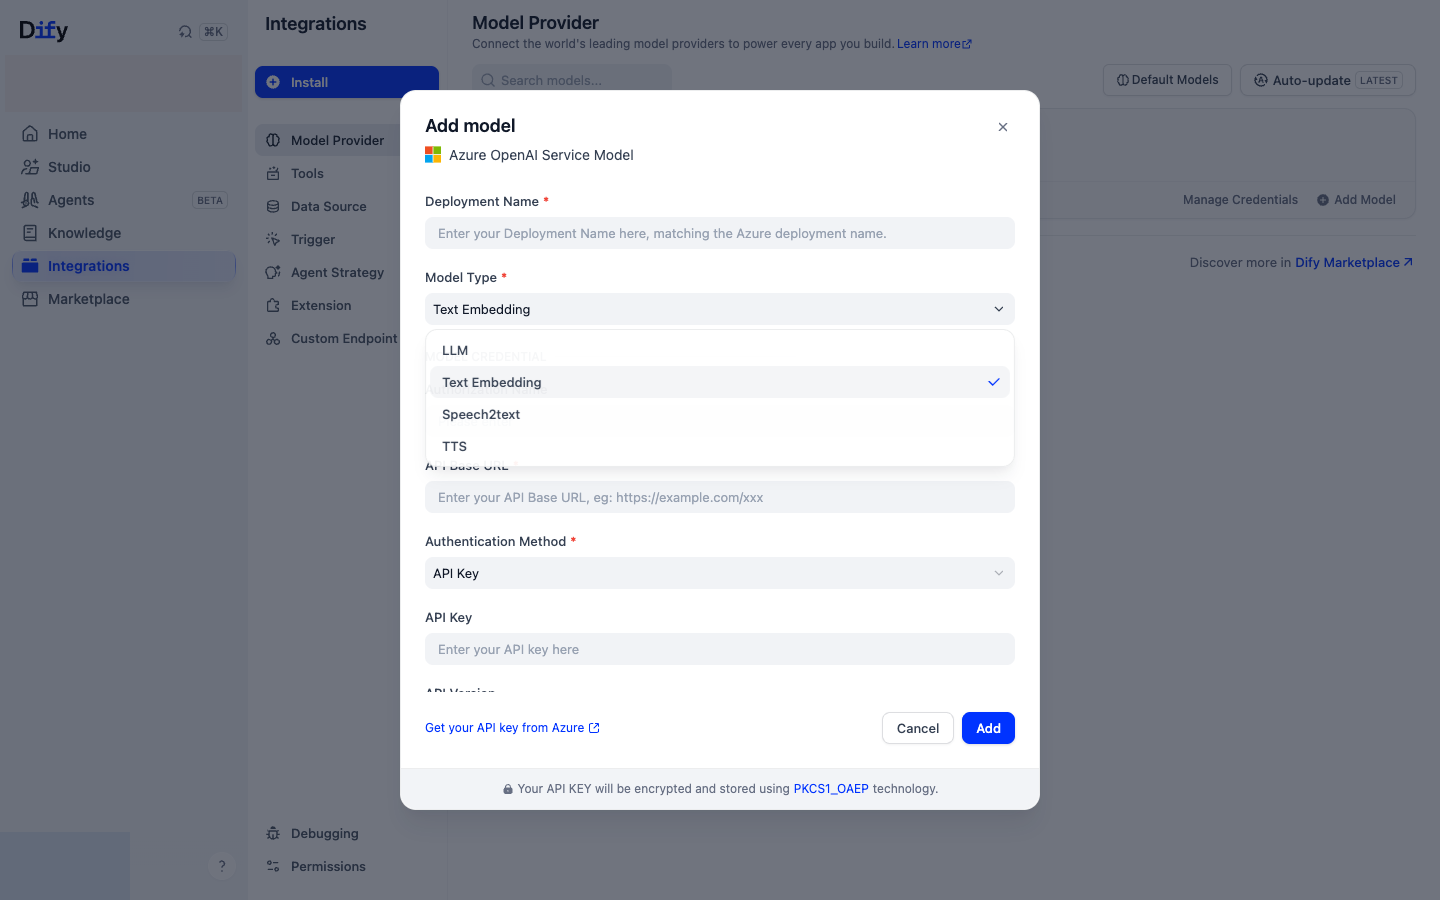
📋 Configuration Values
Use the credentials provided earlier to configure the model:
| Field | Value |
|---|---|
| Model Name | text-embedding-3-large |
| API Version | 2024-12-01-preview |
| Endpoint | (paste endpoint URL) |
| API Key | (paste your key) |
4. Configure System Model Settings
🔧 Configuration Steps
Click on the System Model Settings button
Select the gpt-35-turbo-16k model for reasoning and text-embedding-3-large for embedding
Click Save
We won't use Rerank Model nor Speech to text features in this exercise.
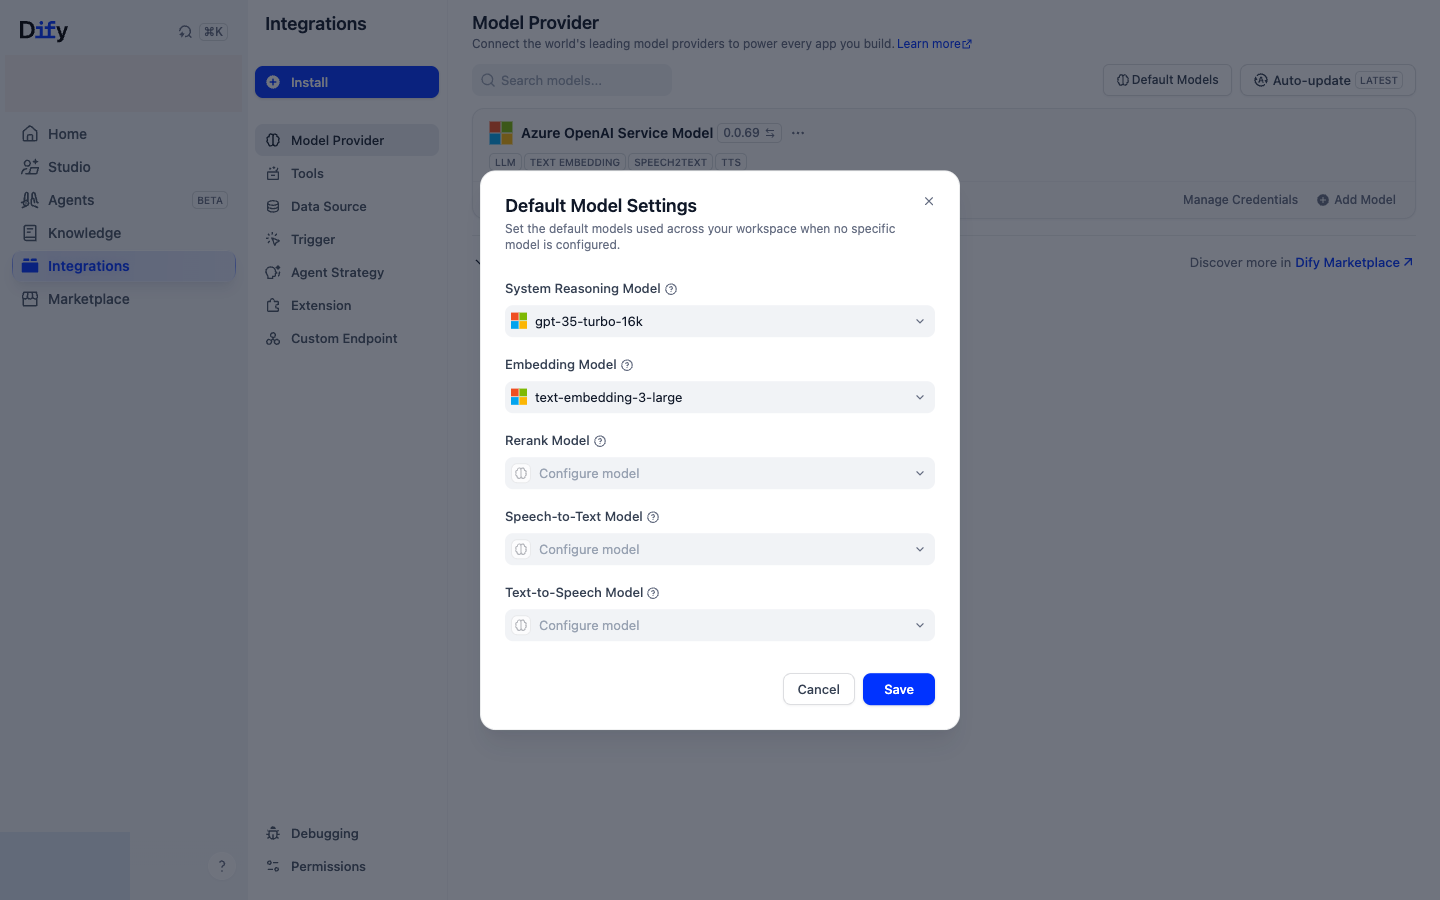
🎉 Success! Your LLM is Connected
You should now see both models configured in your Dify instance
🧪 Exercise 1B: Connect a Local Model
You have just run a workflow against Azure OpenAI. This exercise runs the same workflow against a model that is not a managed cloud API, so you can compare quality, latency and cost with everything else held constant.
Keep your Azure setup. It stays your known-good baseline, and every later exercise still works against it.
🎯 Objective
Configure Dify's official Ollama provider against a model your classroom runs, then run your Exercise 1 workflow on it and compare.
🏗️ Where the model actually runs
Your classroom runs one shared Ollama service for the whole session, on its own machine. It is not installed on your Dify instance, and it is not on your laptop.
That machine downloads the model once for the entire room rather than once per person, which is why this works on conference Wi-Fi at all. You reach it over HTTPS with a token that belongs to your seat.
   Your Dify instance ─┐
                       ├─► HTTPS + your token ─► auth proxy ─► Ollama ─► model
   Another learner's ──┘                                      (private port)
You get an endpoint, a model name and a token. You do not get shell access to that machine, and you do not need it.
Two paths
| Path A — Classroom model | Path B — Your own laptop | |
|---|---|---|
| Who runs it | Your instructor | You |
| Setup time | ~2 minutes | ~20 minutes |
| Needs a good network | No | Yes, for the model download |
| Use when | You are in the workshop | You are self-studying later, or the classroom model is unavailable |
Path A is the classroom path. Use it unless your instructor says otherwise.
🅰️ Path A: The classroom shared model
1. Find your model credentials
Go back to the assignment page where you got your Dify URL and your Azure credentials. Below the Azure cards there is a Classroom Local Model card containing four things:
| Field | What it is | Example shape |
|---|---|---|
| Base URL | The authenticated HTTPS endpoint | https://llm-<session>.<classroom domain> |
| Model Name | The exact model tag to type into Dify | llama3.2:3b |
| API Key | Your personal seat token | a long hex string |
| Valid Until | When your token expires | a timestamp |
⚠️ Your token is yours. It identifies your seat. Do not paste it into a shared document, a screenshot or a chat channel. If you think it leaked, tell your instructor and they will revoke it — your Dify provider will start failing immediately, which is the point.
If you do not see that card, your session is running without a shared model. Use Path B, or stay on Azure — nothing later in the workshop depends on this exercise.
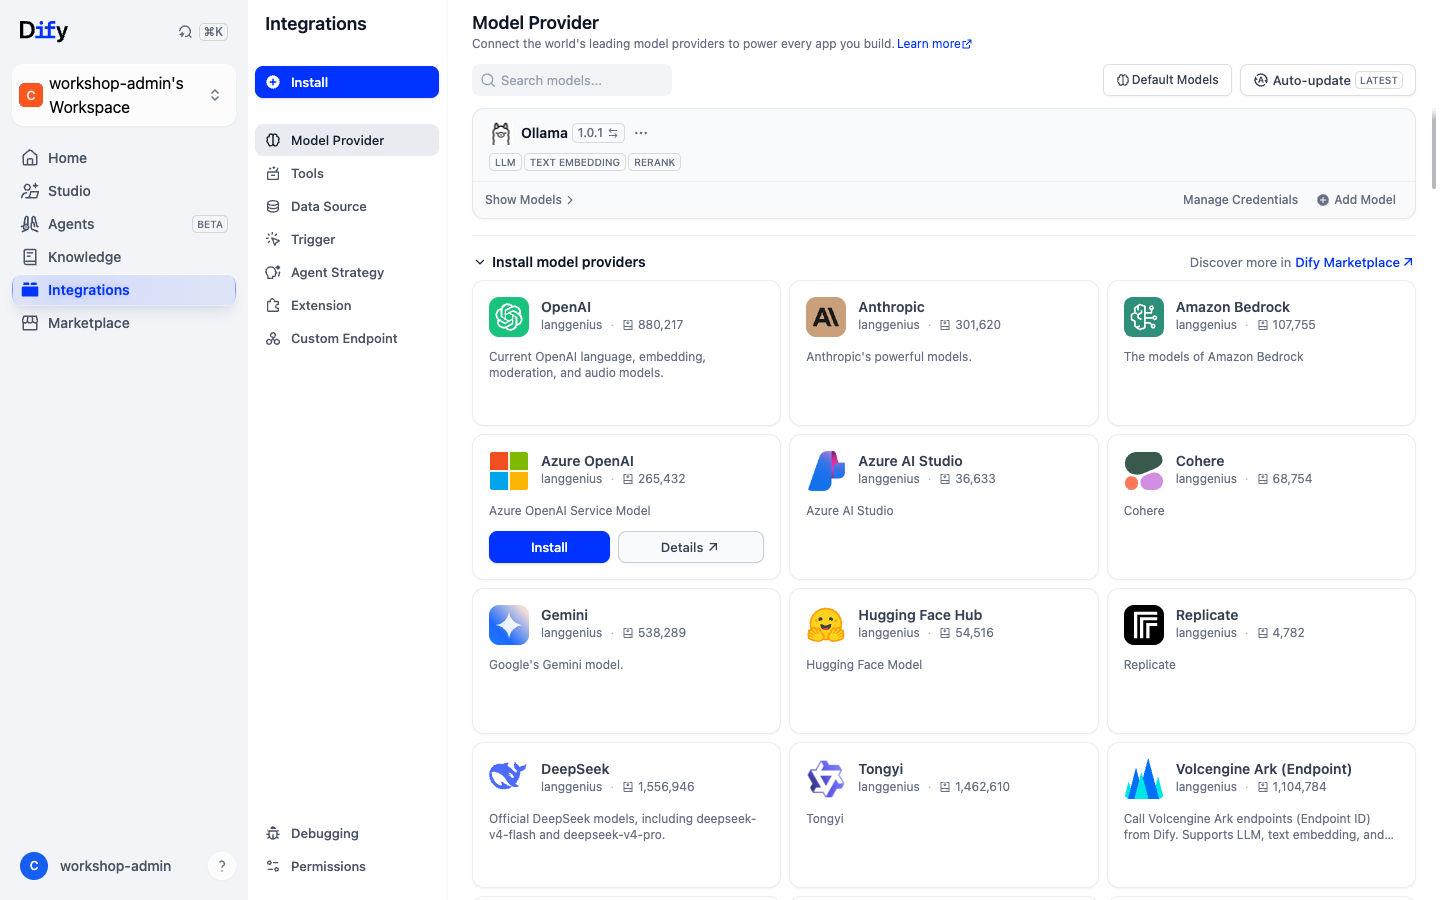
2. Install the Ollama provider
- Open Integrations → Model Provider.
- Install the official Ollama provider from the provider cards.
- Confirm it is installed before registering a model:
3. Add the classroom model
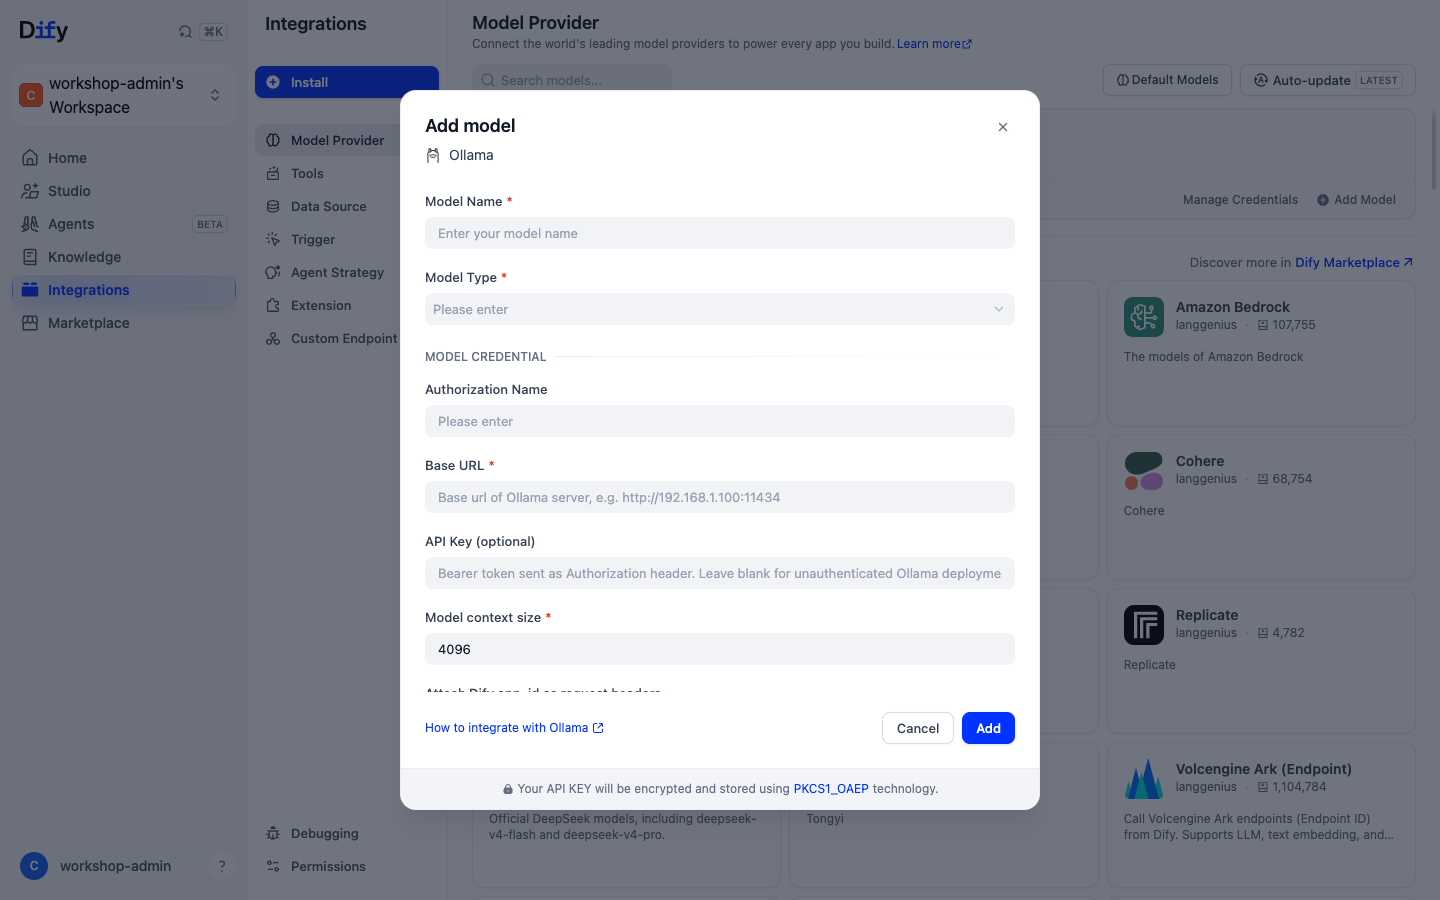
Select Add Model and fill in the form from your credential card:
| Dify field | What to enter |
|---|---|
| Model Type | LLM |
| Model Name | the Model Name from your card, exactly — e.g. llama3.2:3b |
| Base URL | the Base URL from your card, with no trailing path |
| Authorization Name | Bearer |
| API Key | your seat token |
| Model context size | 8192 |
| Upper bound for max tokens | 1024 |
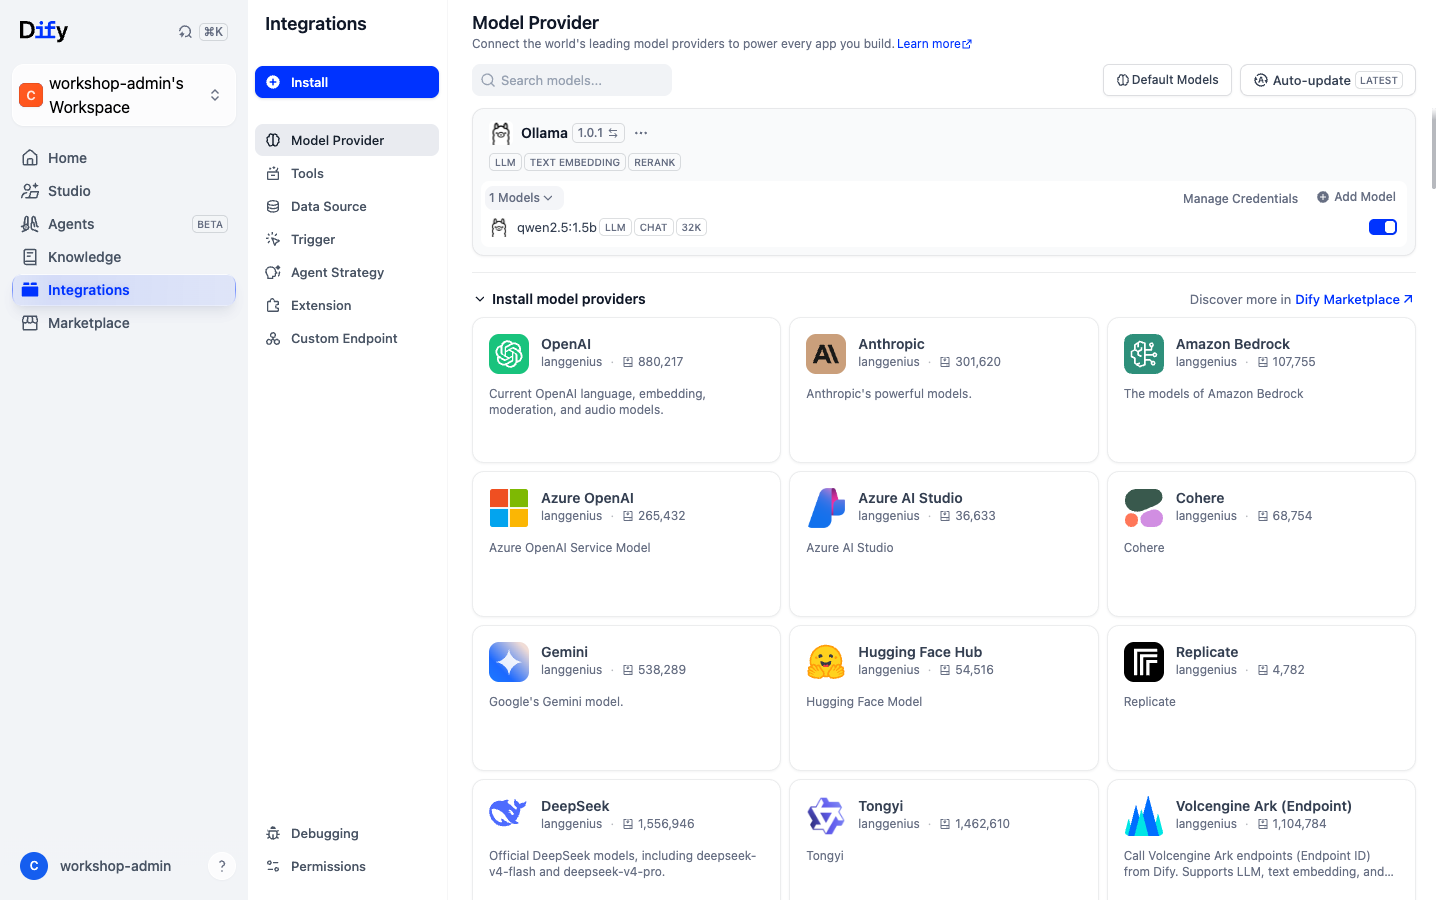
Save. The model should appear under the Ollama provider:
Optional: check the endpoint yourself before configuring Dify
Two commands tell you whether the problem is your token or your Dify form. Replace the placeholders with your own values:
# Without a token: must return 401.
curl -s -o /dev/null -w '%{http_code}\n' https://YOUR-BASE-URL/api/tags

# With your token: must return 200 and list the model.
curl -s -H "Authorization: Bearer YOUR-TOKEN" https://YOUR-BASE-URL/api/tags
401 on the second command means the token is wrong, expired or revoked. A connection error means the endpoint is wrong or the service is down — ask your instructor rather than retrying harder.
4. Run the same workflow
Open your Exercise 1 workflow, select the LLM node, and switch its model from Azure OpenAI to the Ollama model. Change nothing else — same prompt, same inputs.
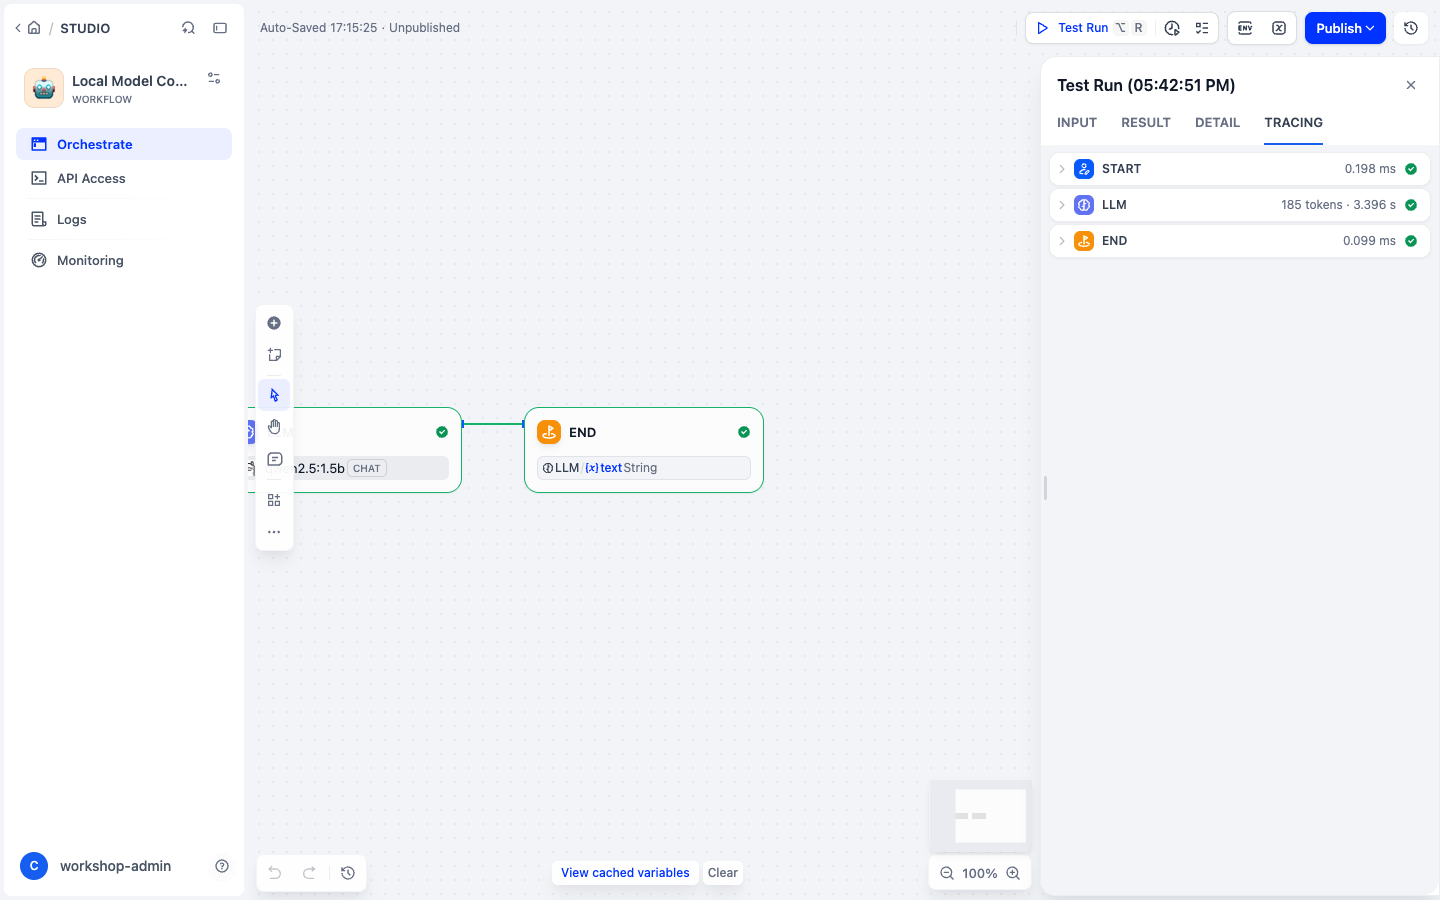
5. Compare against Azure
Switch the node back to Azure, run the same prompt again, and record both:
| Classroom model | Azure OpenAI | |
|---|---|---|
| Time to first token | ||
| Total response time | ||
| Did it follow the format you asked for? | ||
| Did it invent anything? | ||
| Who can see your prompt | your classroom only | Azure |
| Marginal cost per request | none — the host is already paid for | per token |
The comparison is only meaningful if the prompt and the retrieval context are identical. Change one thing at a time.
What you should expect. A 3-billion-parameter model on a shared CPU is noticeably slower and less reliable at following instructions than a hosted frontier model. That is the lesson, not a fault: you are seeing what "local and private" actually costs in latency and quality, so you can decide when that trade is worth making.
🅱️ Path B: Your own self-hosted model (optional)
Use this when you are studying on your own, or when the classroom model is unavailable and you would rather not use Azure.
- Ollama on the same host or network as Dify: install Ollama, run
ollama pull qwen2.5:1.5b, and use the Ollama provider's native endpoint. - Ollama on your laptop with remote Dify: do not enter
localhost. Dify resolves that name inside its own container, not on your machine. Use an authenticated HTTPS gateway or a private network route Dify can reach. - LM Studio: start its local server mode and use its documented OpenAI-compatible endpoint, only when Dify can reach it.
- Self-hosted vLLM/TGI: expose a private, authenticated endpoint reachable from the Dify runtime network.
Never expose Ollama's unauthenticated port to the internet. It has no authentication of its own, and its API can pull and delete models. Put TLS and authentication in front of it, and use the smallest model and context window that meet the goal.
The reference setup used for these screenshots was:
ollama serveollama pull qwen2.5:1.5b- A loopback-only proxy on
127.0.0.1:8787forwarding to Ollama, rejecting requests without a bearer token cloudflared tunnel --url http://127.0.0.1:8787- Two checks: unauthenticated
GET /api/tagsreturns401, authenticated returns200
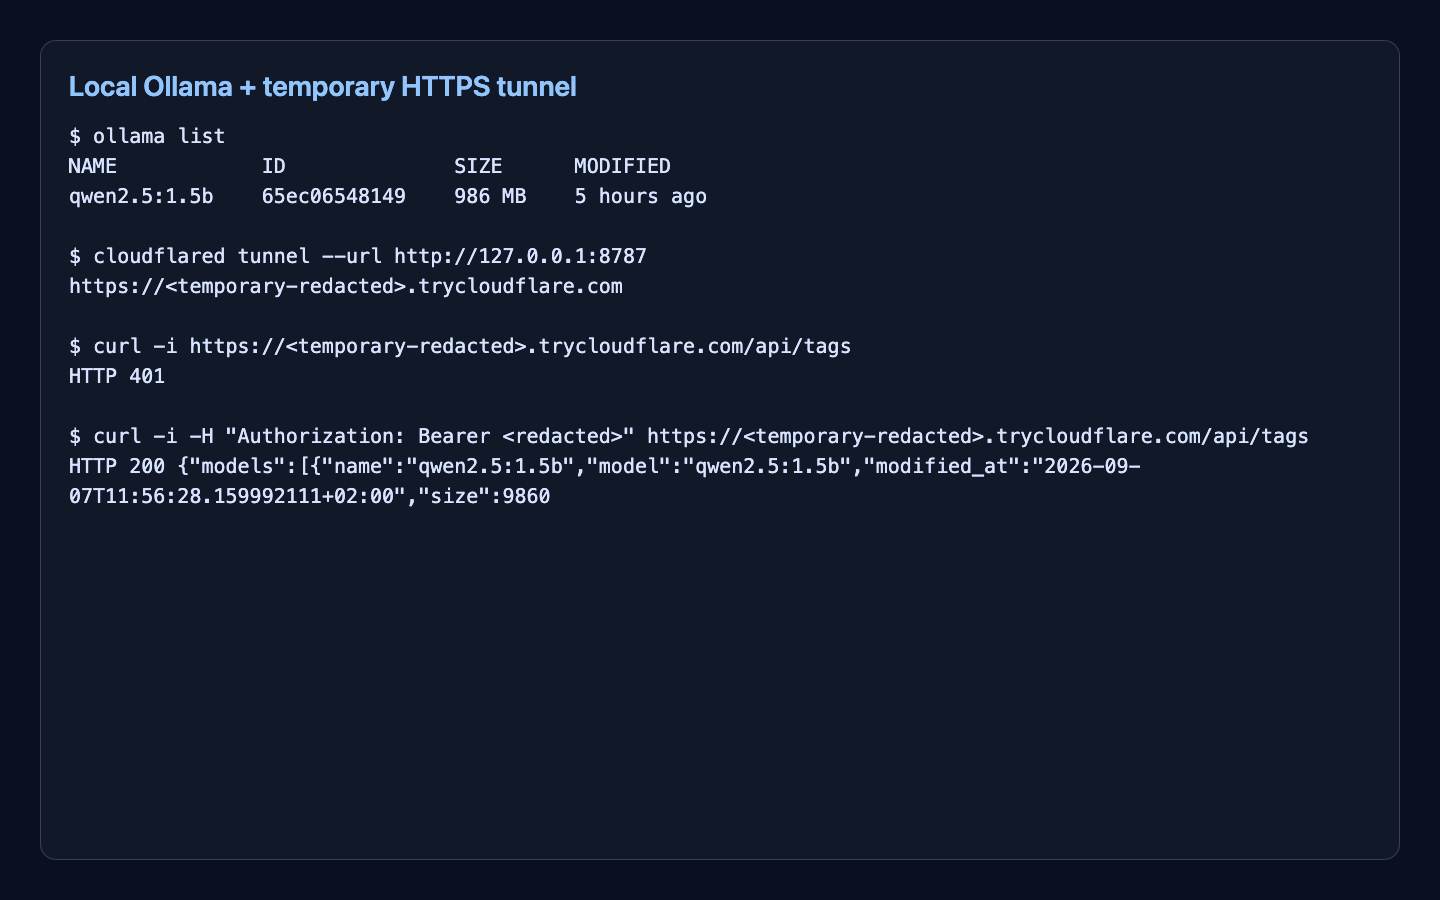
Then register it in Dify exactly as in Path A step 3, using your own base URL, your own token and your own model tag.
Parameter starting points
| Parameter | Starting value | Adjustment signal |
|---|---|---|
| Temperature | 0.3 | Increase only if answers are too rigid. |
| Top P | 0.9 | Lower if output becomes noisy. |
| Max tokens | 512-800 | Lower to control latency on a shared host. |
| Timeout | 60-120s | CPU inference is slow; a short timeout looks like a broken model. |
For comparing model quality, latency and hardware efficiency, Artificial Analysis is a useful discovery aid — not a decision source. Confirm the model card, license, context limit and your own representative prompts before choosing.
🚦 When the classroom model is busy or down
The shared host serves the whole room, so you will occasionally meet its limits. These are expected and each has a specific meaning.
| What you see | What it means | What to do |
|---|---|---|
429 / "at capacity" | Too many people generating at once. Requests queue; past the queue limit they are refused. | Wait a few seconds and retry. Do not retry in a tight loop — it makes the queue worse for everyone. |
401 | Your token is wrong, expired, or was revoked. | Re-copy it from the assignment page. If it still fails, ask your instructor. |
| Very slow first response | The model was evicted from memory and is reloading, or the host is saturated. | Wait. The first request after an idle period legitimately takes much longer. |
502 / 503 / connection refused | The service is down or restarting. | Switch your LLM node back to Azure and carry on. |
The classroom model is never a blocker. Every exercise in this workshop works against Azure. If the local model misbehaves, switch the LLM node back and keep going — you can return to Exercise 1B later.
🧹 Cleanup and restoration
During the workshop you do not need to clean anything up. Your token expires on its own and your instructor tears down the shared host when the session ends.
If you want your Dify back to the Azure-only state:
- Open the LLM node in your workflow and switch the model back to your Azure deployment.
- Check Settings → Model Provider → System Model Settings still points at Azure for the system reasoning model.
- Optionally remove the Ollama model entry under the Ollama provider. Leaving it is harmless — it simply stops working once your token expires.
After the workshop the endpoint stops resolving and your token is revoked. A saved Ollama provider entry pointing at it will fail; delete it, or repoint it at your own endpoint using Path B.
If you used Path B, stop your tunnel and your local Ollama (ollama stop, or quit the app). A tunnel left running is an authenticated route into your laptop.
✅ Completion Check
This exercise is complete when:
- You ran at least one prompt through your chatbot using the local model.
- You switched back to Azure and ran the same prompt.
- You can state one concrete difference in latency and one in answer quality.
- You know what you would do if the local model stopped responding mid-demo.
🧯 Troubleshooting
- 401 Unauthorized: re-copy the token from your assignment page — a trailing space is the usual cause. If it still fails, the token was revoked; ask your instructor.
- 429 / "at capacity": the shared host is saturated. Wait and retry once; do not loop.
- Connection failed: confirm the base URL matches your card exactly, including
https://and with no trailing path. On Path B,localhostmeans the Dify runtime, not your laptop. - Model not listed: the model name must match the tag exactly, including the part after the colon.
- Slow answers: expected on a shared CPU host. Reduce max tokens and keep retrieval chunk count small while tuning.
- Poor relevance: keep your embedding model quality high even when generation uses a smaller local model. Retrieval quality and generation quality are separate problems.
- Timeouts in Dify: raise the node timeout to 60-120s. CPU inference is genuinely slow, and a short timeout is indistinguishable from a broken model.
🤖 Step 5: Create Your First Chatbot
1. Create From Blank
Go to Studio → Chatbot → Create from Blank:
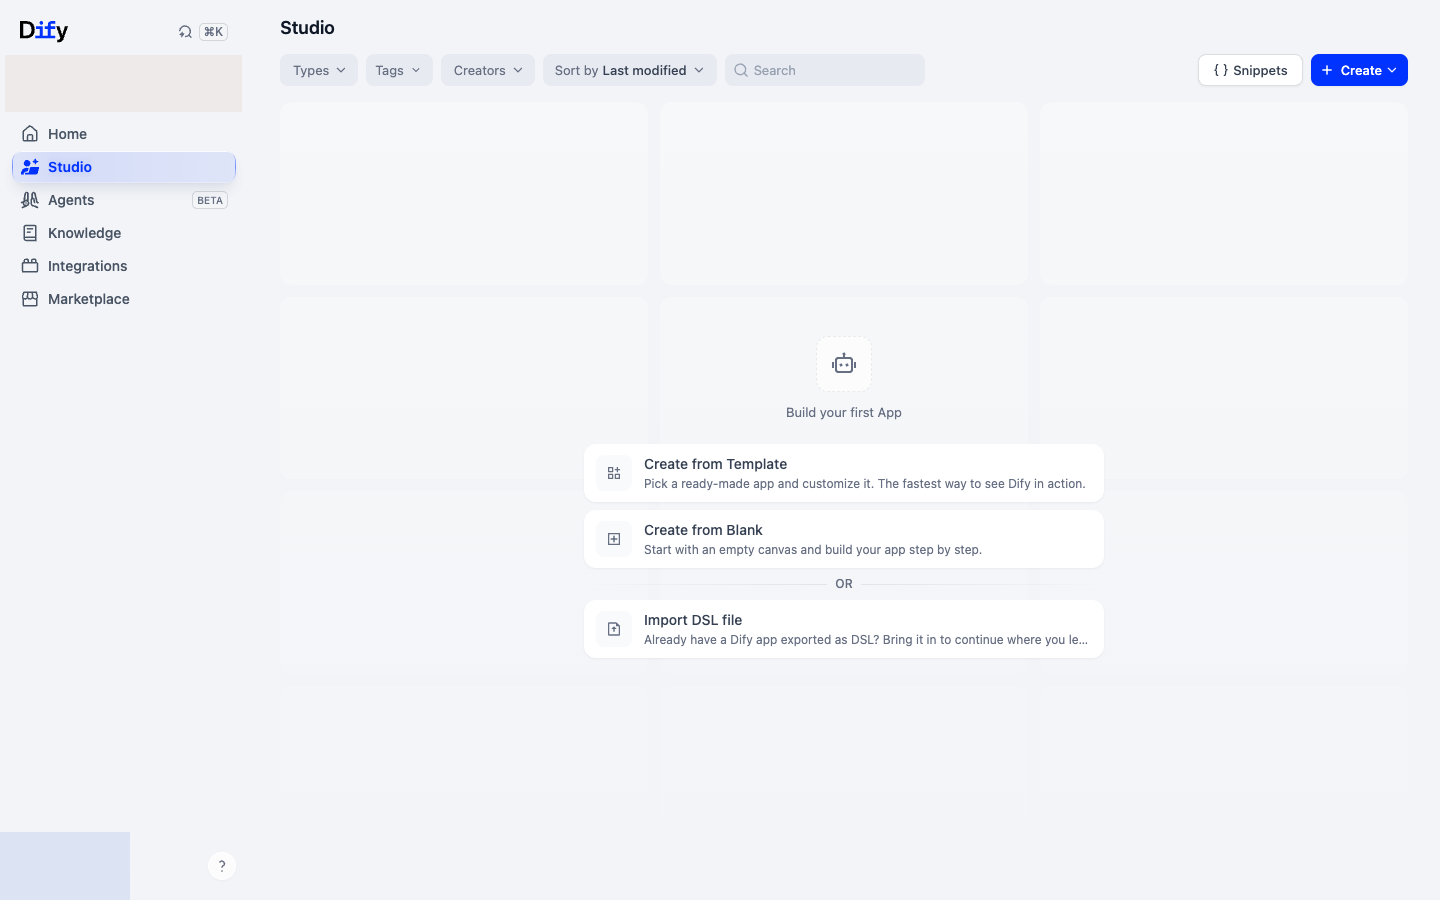 Screenshot: Creating a new chatbot from scratch
Select Workflow
Give your bot a name and description
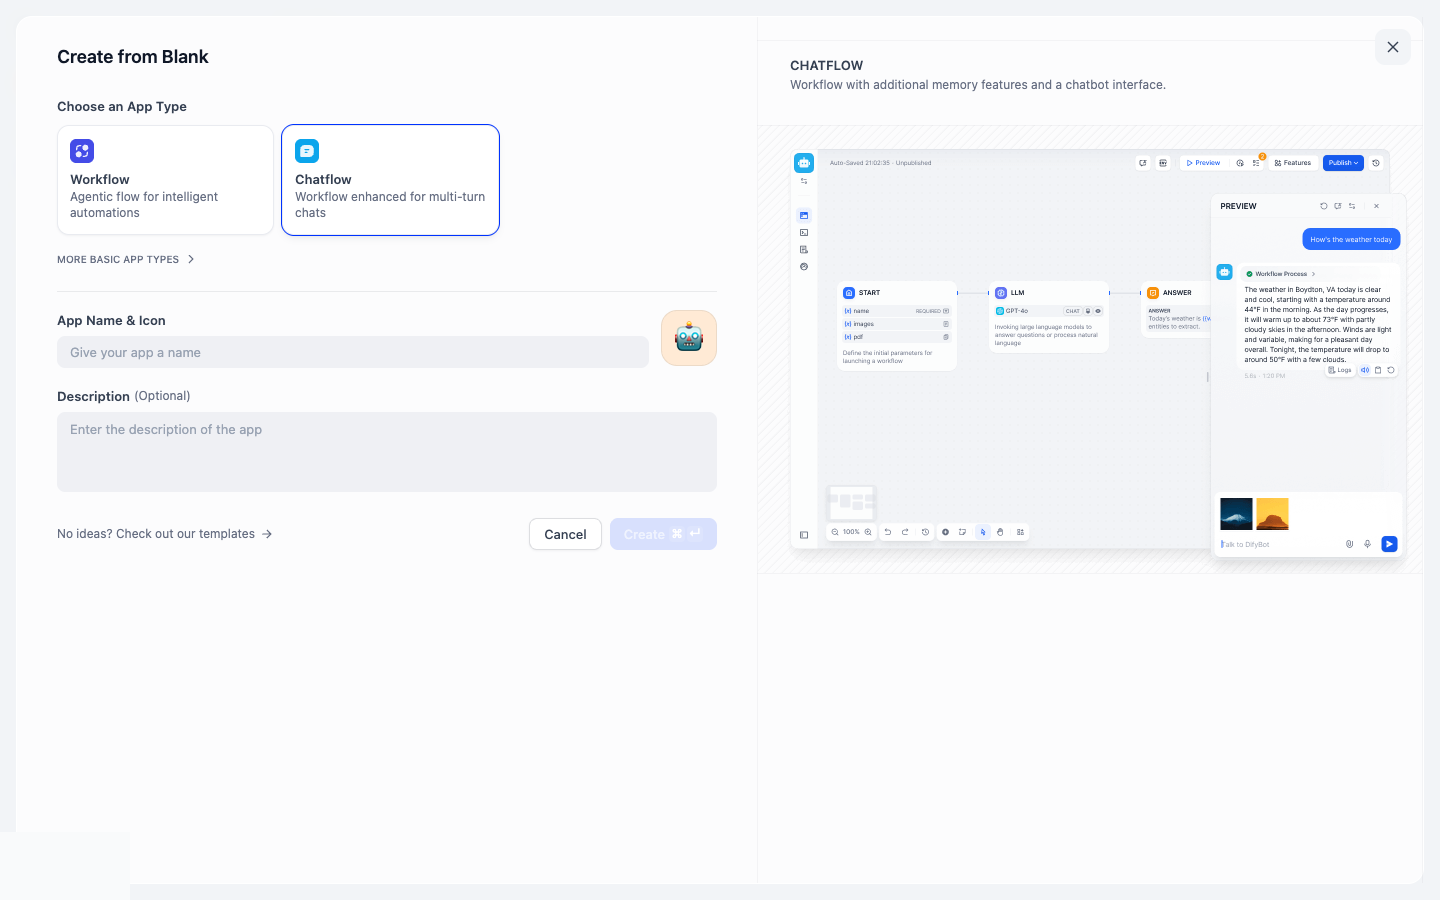 Screenshot: Configuring your chatbot
2. Setup Query Input
🔧 Input Configuration Steps
Configure the input field that will receive user questions for your chatbot.
Click on the start block and then click the + button to add an Input Field
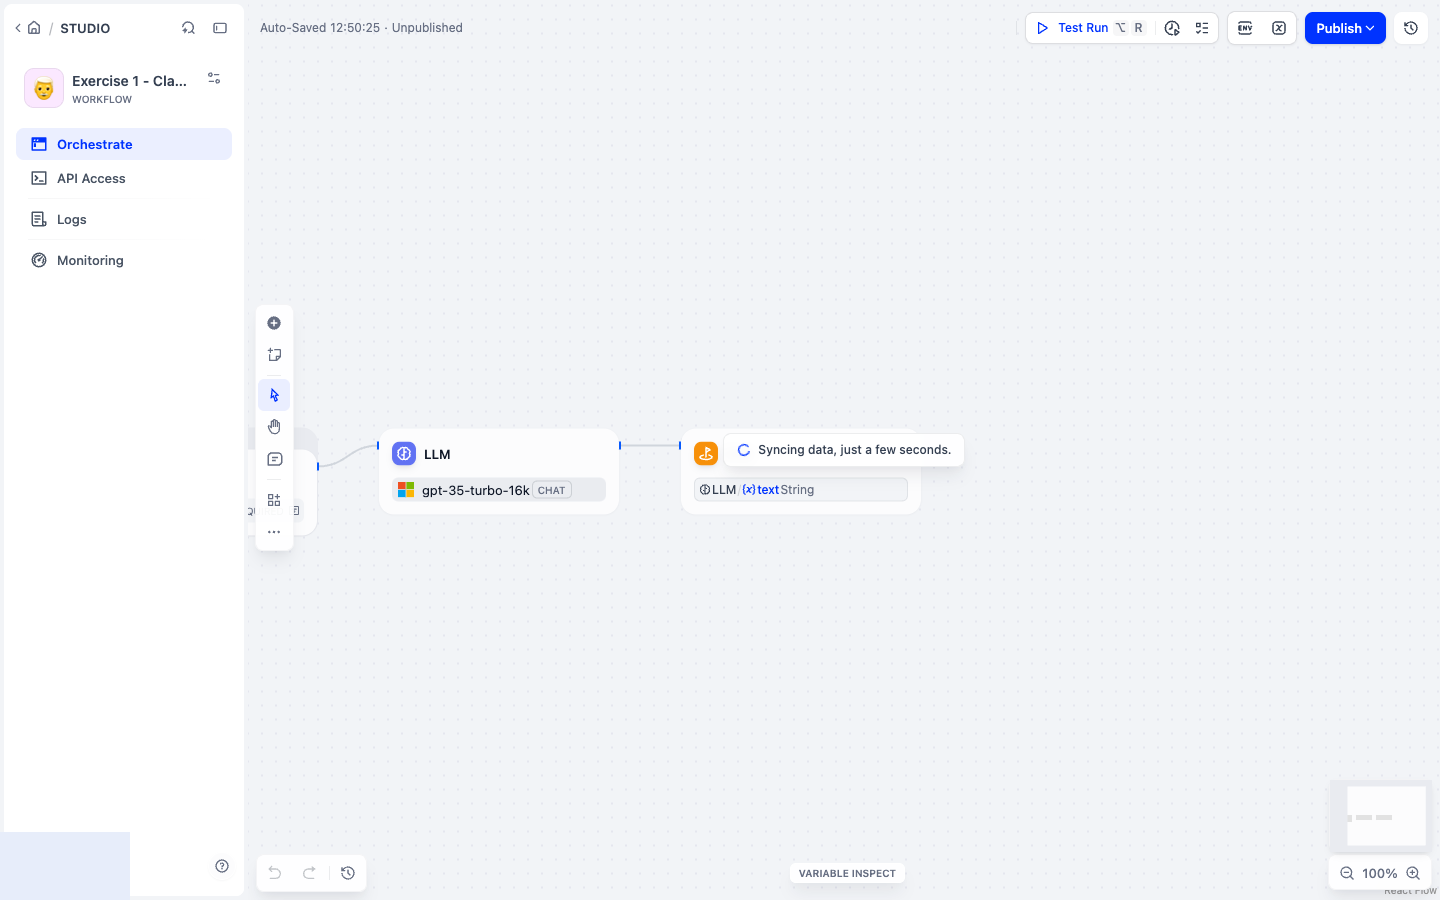 Step 1: Click on the start block to add input field (click to expand)
- Configure the input field:
- Name it
query - Set max length to
200 - Click Save
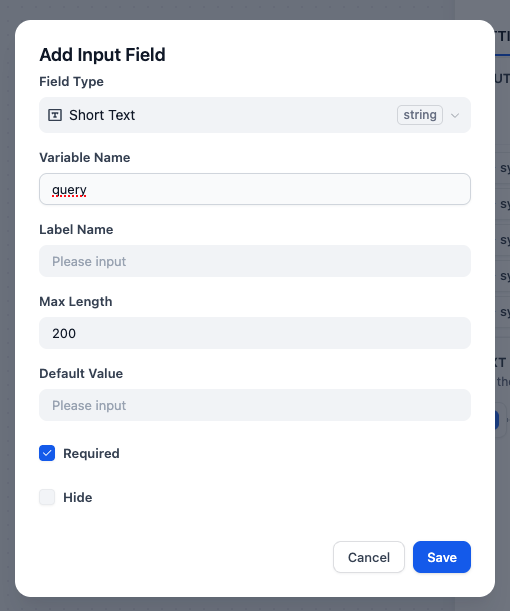 Step 2: Configure input field settings (click to expand)
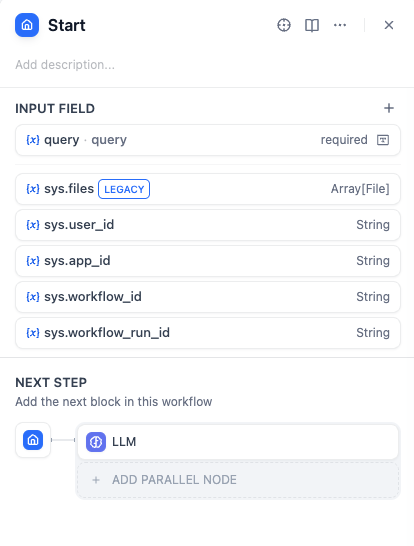 Step 3: Final start block configuration (click to expand)
 - Name it
3. Add LLM Block
🧠 LLM Configuration Steps
Add and configure the LLM block that will process user queries and generate responses.
Add the LLM block: Click + and select the LLM block from the available options
 Step 1: Select LLM block from available options (click to expand)
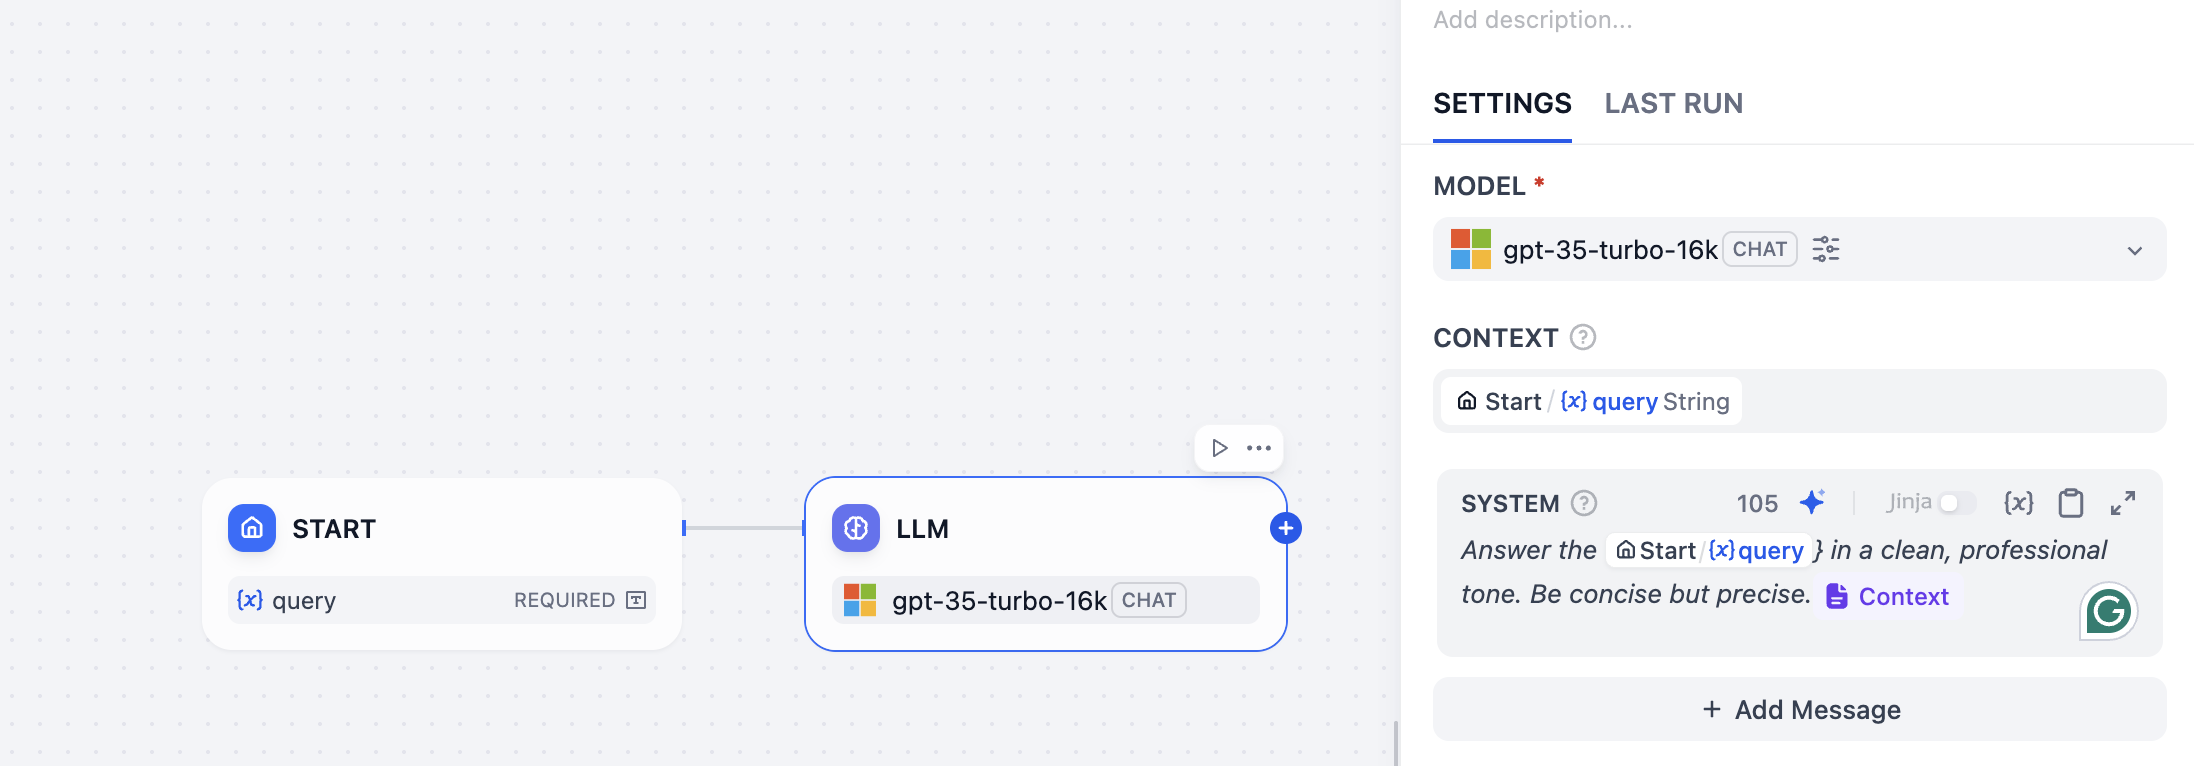
- Configure the LLM:
- In Context field add the query variable
- In Prompt field add the system prompt, that should include the query variable and the context variable
Add a System Prompt: This helps the AI understand how to respond
💡 Example System Prompt:
"Answer in a clean, professional tone. Be concise but precise."
Bind variables: Connect the prompt to
queryusing the {x} selector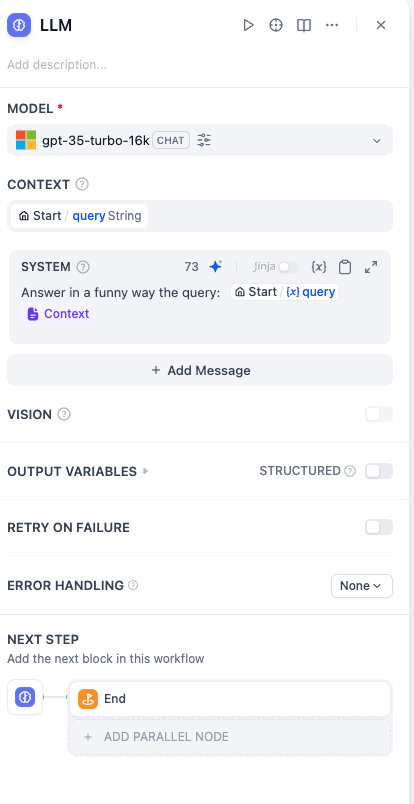 Step 2: Configure LLM settings and bind variables (click to expand)
4. Add End Block
🏁 Final Configuration
Complete your workflow by adding an end block to output the LLM response.
Add an End block: Click + and select the End block
Configure the output: Create an output variable (e.g.,
text) linked to the LLM response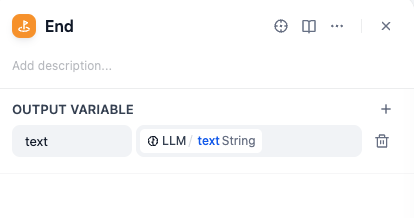 Configure the end block to output LLM response (click to expand)
🧪 Run and Debug
🧪 Testing Your Chatbot
Test your chatbot to ensure everything is working correctly and see how it processes queries.
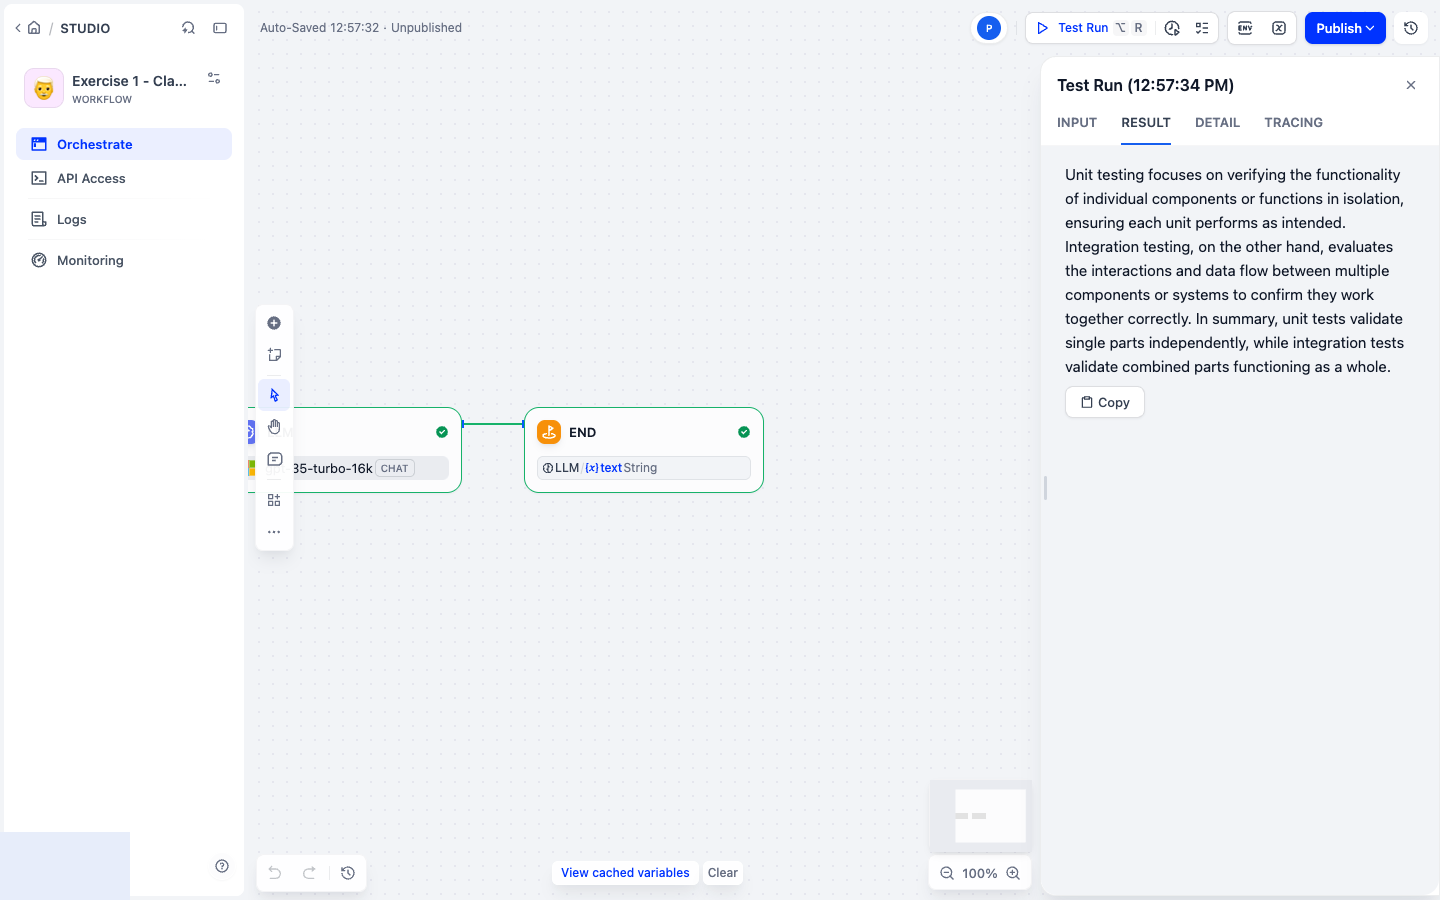
🚀 Step 1: Run Your Chatbot
Click the "Run" button in the top-right corner of your workflow
Input a test question and click "Start Run"
💡 Try This Test Question:
"What is the difference between unit and integration testing?"
🎉 Expected Results
You should get a response from your magical assistant! The LLM will process your question and provide an answer.
🔍 Step 2: Debug and Trace
Check the Tracing tab for a detailed breakdown of what your chatbot did:
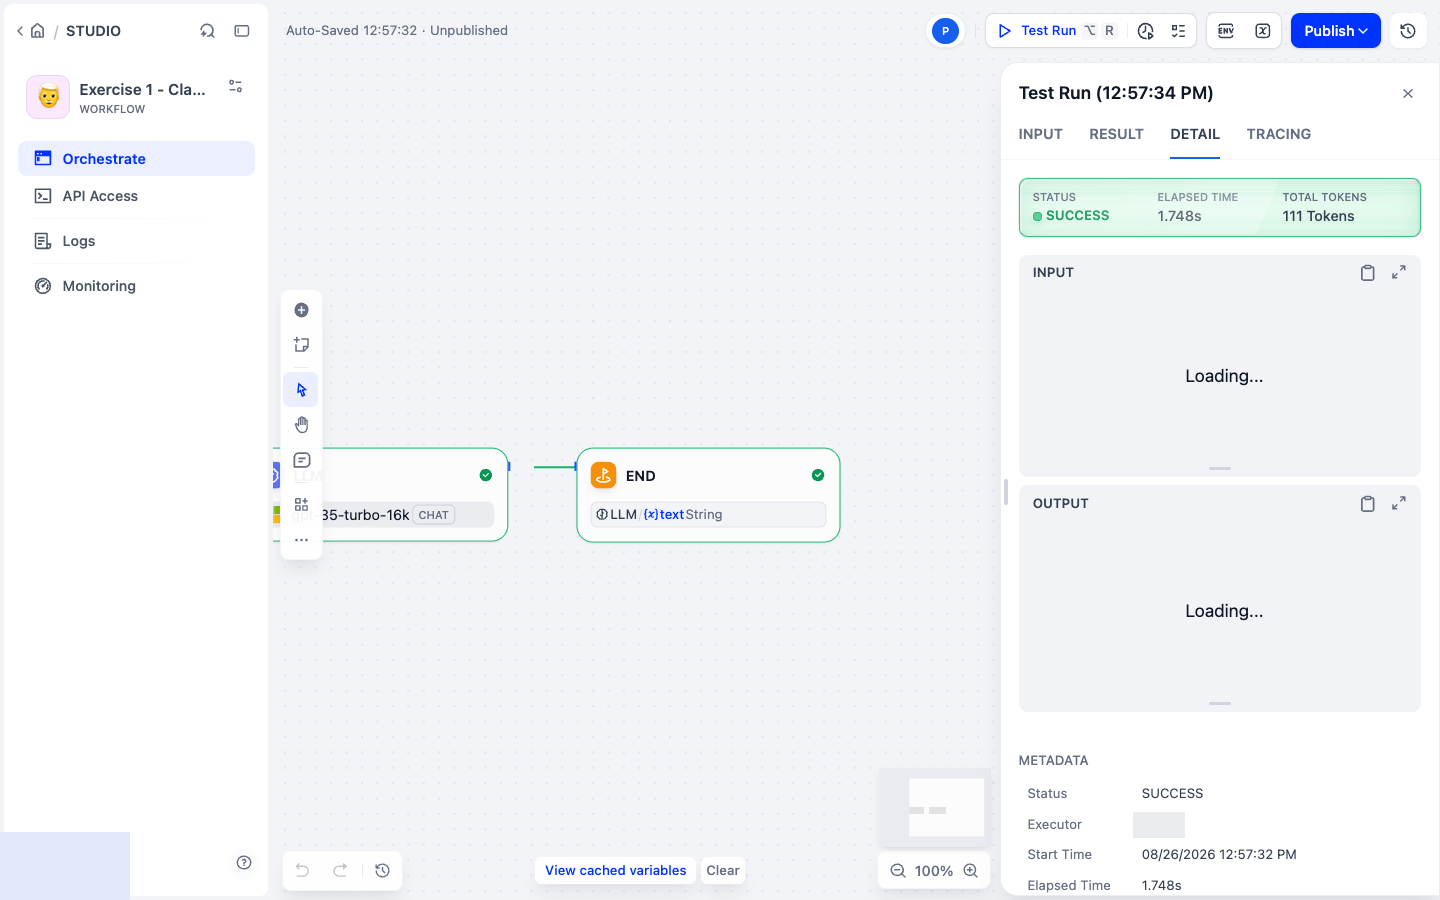
🧠 Pro Tip: The tracing tab shows you exactly how your chatbot processed the input, including token usage and response generation steps.
🎯 Exercise Complete! What's Next?
🎉 Congratulations!
You've successfully connected your LLM and created your first AI chatbot!
✅ What You've Accomplished:
- ✅ Connected to Azure-hosted GPT models
- ✅ Configured both LLM and embedding models
- ✅ Created your first AI chatbot
- ✅ Tested the complete workflow
🚀 Ready for the Next Challenge?
In Exercise 2, you'll learn about:
- 📚 Document chunking strategies for better RAG
- 🔧 Uploading Jira issues and technical documentation
- ⚖️ Comparing different knowledge base approaches
- 🧠 Preparing your chatbot for advanced RAG capabilities